Our Treehouse Guest Suite: Budget, Layout & What We’d Do Differently
We always dreamed of building something magical for our daughter—a place to play, imagine, and maybe even sleep under the stars. But it also had to be practical: a potential guest room, a retreat, a space for family overflow. That’s how our treehouse guest suite came to life.
Why We Built It
At The Station, we wanted to create separate spaces—some for shared time, and others for solitude. Our main cabin is compact and cozy, but with regular guests and a growing child, we needed more room. Rather than building an extension, we decided to build up—into the trees.
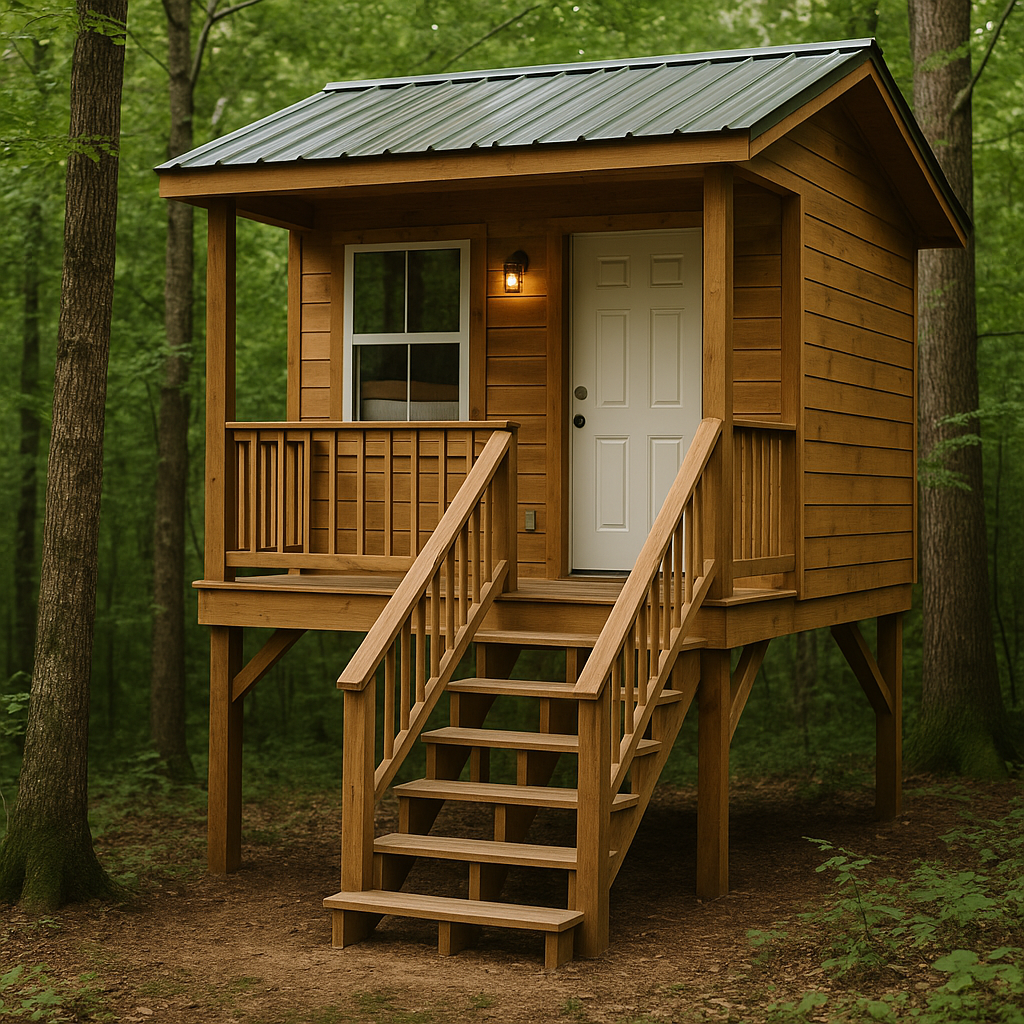
The Basic Layout
- Interior: 12×12 floor plan with two built-in bunks along the back wall
- Deck: A 4-foot covered deck across the front, perfect for coffee and stargazing
- Access: Raised on posts with a wide staircase (no ladders—this had to be family-friendly)
- Amenities: Solar lights, battery-powered fan, and plans for a composting toilet nook
What It Cost Us
We set a goal of keeping it under $5,000, and we hit it (barely). Here’s where the money went:
- Lumber: $2,100 (sourced from a local sawmill for major savings)
- Roofing & Hardware: $800
- Windows & Door: $500 (Facebook Marketplace!)
- Insulation & Siding: $700
- Solar Lighting & Battery Setup: $350
- Miscellaneous (paint, screws, stain): $400
Tools We Used (And Recommend)
This project took a small but mighty tool kit:
- Circular saw: For framing and siding cuts
- Drill/driver set: We used this every day
- Speed square & level: To keep it safe and straight
- Palm sander: For finishing the bunks and deck rail
We’ll be sharing our full tools list with affiliate links in an upcoming Resources post.
How Long It Took
We spread the work across 4 long weekends. Weekend 1 was post setting and framing. Weekend 2 was roofing and sheathing. Weekend 3 focused on siding and insulation. Weekend 4 finished out trim, decking, and furnishing the bunks.
What We’d Do Differently
Every project teaches you something. Next time, we’d do these things differently:
- Prefab the floor deck sections in advance: This would’ve saved hours onsite.
- Install bunks before finishing walls: It was tight to maneuver inside afterward.
- Add screened windows from the start: Bugs got in fast.
How It’s Used Now
We’ve hosted friends, my in-laws, and our daughter’s sleepovers here. It’s part hideaway, part retreat—and honestly, one of the coziest spaces on the land. Some nights I sneak away from the main cabin to write in it by lantern light.
If you’re considering a small structure like this—go for it. It doesn’t have to be fancy. It just has to be intentional. The best places are built with heart, not money.
Involving Our Daughter in the Build
This wasn’t just a parent project. We wanted our daughter to feel a sense of ownership too. From day one, she had a “project bucket” with her own gloves, small hammer, and a handful of safe tasks like handing us screws, helping sweep the floor, and decorating the bunk walls with watercolor art. It wasn’t always efficient—but it made the process joyful.
On days when she wasn’t interested in helping, we kept a few go-to self-play stations nearby: a drawing table under a tarp, a stack of nature books, or a simple scavenger hunt list. Cabin projects are more fun when your kid is entertained and nearby.
Why It’s Better Than a Guest Room
We debated whether to convert our second bedroom into a full-time guest space. But building the treehouse gave us flexibility without sacrificing our home layout. When not in use, it’s a peaceful writing cabin, a reading nook, or even a quiet nap zone after a long hike. Plus, the sense of arrival—climbing into the trees—is unlike anything you get from a room inside the main house.
Would We Do It Again?
Absolutely. In fact, we’re already sketching out a second micro-structure—maybe a sauna or an outdoor bath house. Building with your own hands, for your own people, changes your relationship with your home. You see each nail, each board, and each mistake with pride. It’s imperfect—but it’s yours.
If you’re dreaming of adding a small guest space to your land, consider going vertical. A treehouse doesn’t have to be complex. Ours is just a box on posts with heart and vision. And the memories it’s already created are worth far more than the lumber.
Final Thoughts: Build What You Need Most
Whether it’s a treehouse, a shed, or a studio in the woods, think about what kind of space your life actually calls for. Is it privacy? Play? Overflow space for guests? A creative nook? Let your needs shape your design, and don’t be afraid to keep it simple. What made this build successful wasn’t the finishes—it was the intention. It gave our family space to grow, imagine, and connect. That’s worth more than any square footage.
]]>